English
 中文简体
 русский
 Español
[Auto Accessories][email protected]
2026-11-16
A rear view mirror hanging from its wiring after it pops off the ball mount is usually not a windshield failure. On most cars, the mirror housing snaps onto a ball stud and is held by a spring clip or retaining ring inside the socket. If the ball is still tight on the windshield button and the plastic socket is intact, you can often press the mirror back on in a few minutes. If the button has pulled off the glass, stop: that is an adhesive repair, not a snap-fit repair. The difference matters because forcing the wrong joint can crack the housing or loosen the button further.
Content
Interior mirrors use at least two connections that owners describe as a ball mount. Before you push anything, look closely at where the movement is. A mirror that flops against the glass but still hangs from its arm has probably separated at the housing socket. An arm that is loose at the windshield has a different problem. Use the table below as a quick check.
| Joint or mount | What you will see | Correct approach | Main risk if forced |
|---|---|---|---|
| Mirror head to stem ball | Housing loose, ball exposed, spring ring may be visible | Clean and press the socket straight onto the ball; replace a bent ring | Cracked housing or a socket that will not hold |
| Stem to windshield button | Arm loose on the button, glass still clean | Check the slide or set screw, then reseat or replace the bracket | Stripped button or a mirror that drops while driving |
| Button to glass | Button and mirror off the glass, bare glass patch | Rebond with mirror adhesive and respect the full cure time | Failed bond, cracked glass, or a mirror falling in traffic |
If you see a split in the socket, a missing spring ring, or a shiny flat spot on the ball, the parts may be worn beyond a simple reseat. A clean click is a good sign; a soft, repeated pop-off is not.
You need very little to do this job, but the right small items keep the repair from becoming a parts order. Work in good light and keep both hands on the mirror housing rather than pulling on the arm.
Clean grease, dust, and old adhesive residue from the ball. Inspect the socket for a thin spring clip or split ring. If the ring is bent or missing, the mirror may click on and then fall off again. A trace of soapy water can help a tight rubber socket slide into place, but avoid oil or grease on the pivot; it can reduce friction and let the mirror droop over bumps. Dry-fit the parts first so you know how they line up before you press hard.
Most interior mirror heads go back on with a firm, square press. The goal is to seat the socket over the ball without twisting the housing or bending the arm.
On some mirrors, the socket is angled and needs to be started at one edge before the rest snaps down. Move slowly and keep the pressure even. If the housing flexes more than a little, you are probably misaligned.
A thin ring inside the socket is what gives the joint its snap. If the ring is bent, the mirror may feel tight for a day and then drop again. Replace the ring or the mirror assembly rather than using glue to take up the slack.
If the small button and the mirror came off the glass together, the ball joint may be fine. The failure is the adhesive pad between the button and the windshield. Do not press the button back on and drive away. Clean the glass and the button, use a proper rear view mirror adhesive kit, and follow the cure time on the package. Many kits need the mirror to stay supported for the full cure, and some need longer before you hang the weight of the mirror. Household glue and double-sided tape are not reliable in a hot cabin.
Also check the mount type. Some arms slide onto a wedge button and lock with a set screw; others twist onto a bayonet-style button. If a set screw is loose, tighten it before you assume the ball socket has failed. If the glass has a star or crack at the button, have the windshield assessed before you reattach anything.
A mirror that is loose is a visibility problem, not just a cosmetic annoyance. The safety role of mirrors is easy to underestimate until the view behind you is blocked or blurred. This overview of how auto side mirrors improve driving safety is a useful reminder of why a proper repair matters.
Reseating works best when the socket, ring, and ball are still in good condition. Replace the mirror if the housing is cracked, the ball is worn flat, the spring ring is missing, or the mirror will not hold position after a clean reseat. A replacement assembly matched to your vehicle is usually more reliable than a repair that depends on a damaged clip.
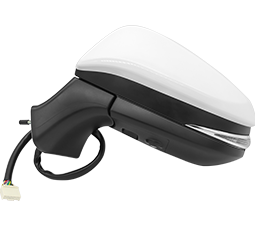 QXP Auto Side Mirror Replacement AssembliesA vehicle-matched outside door mirror line for replacing damaged assemblies, with broad Japanese and other make coverage for OEM and aftermarket use.View Product →
Before ordering, note the mount style, the mirror features, and the vehicle details. A mirror that fits the windshield button but has the wrong arm angle can sit too close to the headliner or leave a blind spot. Once the new mirror is on, adjust it from your normal driving position and check that it stays put over a rough road.


[Auto Accessories][email protected]
[Auto Parts][email protected]

+86-0571-26238568

Kangxin Road, Tangqi Town, Linping District, Hangzhou , Zhejiang , China